Q.How do I display item units? (pieces, etc)
You have the option to set item units: pieces, boxes, tubes, bags, and so on. Setting item units helps avoid misunderstandings by making it clear to a customer exactly what they will receive if they order a given item. You can set a default item unit or set units individually.
Default item units:
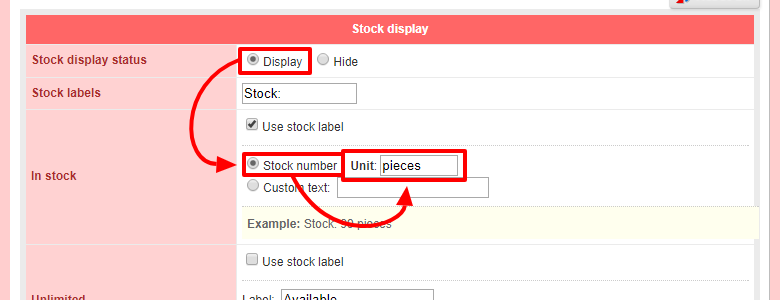
To set a default item unit, navigate in your Shop Manager to Inventory → Stock display. Set Stock display status to Display, select Stock number in the In stock field, and then enter your desired item unit in the Unit: box.

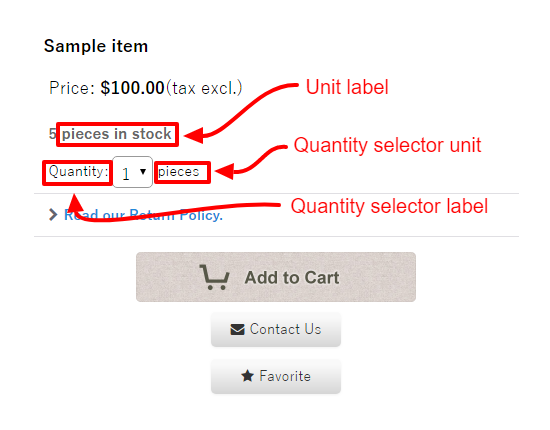
This will change the unit displayed in the stock area of the item description page (see below).
Click  (Save) at the bottom of the page.
Individual item units:
To set an item unit for an individual item, navigate to the item details page from Inventory → Item list. Uncheck Display only required fields at the top and scroll down to the Unit label section. Enter your desired unit label here. If nothing will entered, it will default to the unit set at Stock display settings. As with the unit set at Stock display settings, this will change the unit displayed in the stock area of the item description page.

You can also set individual unit labels for the quantity selector. In the next field after the Unit label section on the same item description page, you will find Quantity selector label. There are two text entry boxes here, Label: and Unit:. Text entered in the Label: box will appear before the quantity selector, while the Unit: box will appear after the quantity selector. In most cases, the Unit: box here should be similar to the Unit label field described above. Again, see the image at the bottom of this article for more information.

The display of each of the elements described on this page will be roughly as in the following image:
